System Use Manual
Operational Guidelines
Create a project
- Click "Project - > Create Project", enter project name, description, and click "Submit" to create a new project.
- Click on the project name to enter the project home page.

Project Home Page contains task status statistics, process status statistics.
- Task State Statistics: It refers to the statistics of the number of tasks to be run, failed, running, completed and succeeded in a given time frame.
- Process State Statistics: It refers to the statistics of the number of waiting, failing, running, completing and succeeding process instances in a specified time range.
- Process Definition Statistics: The process definition created by the user and the process definition granted by the administrator to the user are counted.
Creating Process definitions
- Go to the project home page, click "Process definitions" and enter the list page of process definition.
- Click "Create process" to create a new process definition.
- Drag the "SHELL" node to the canvas and add a shell task.
- Fill in the Node Name, Description, and Script fields.
- Selecting "task priority" will give priority to high-level tasks in the execution queue. Tasks with the same priority will be executed in the first-in-first-out order.
- Timeout alarm. Fill in "Overtime Time". When the task execution time exceeds the overtime, it can alarm and fail over time.
- Fill in "Custom Parameters" and refer to Custom Parameters

- Increase the order of execution between nodes: click "line connection". As shown, task 1 and task 3 are executed in parallel. When task 1 is executed, task 2 and task 3 are executed simultaneously.

Delete dependencies: Click on the arrow icon to "drag nodes and select items", select the connection line, click on the delete icon to delete dependencies between nodes.

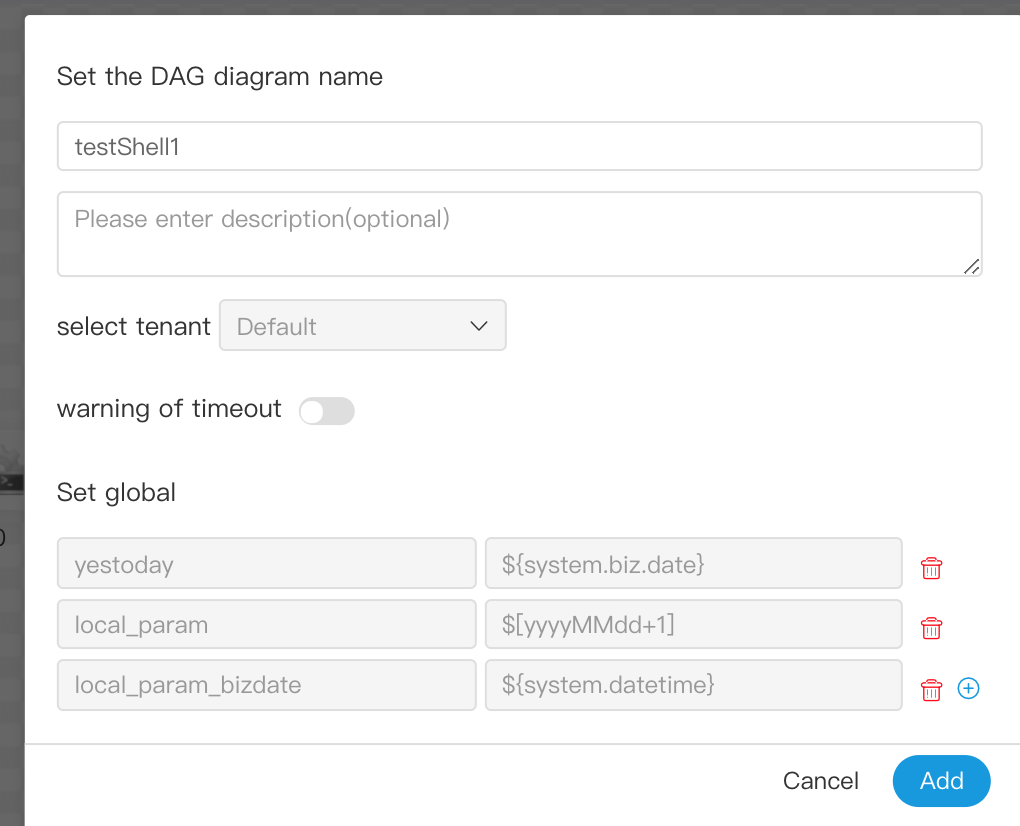
Click "Save", enter the name of the process definition, the description of the process definition, and set the global parameters.

- For other types of nodes, refer to task node types and parameter settings
Execution process definition
The process definition of the off-line state can be edited, but not run, so the on-line workflow is the first step.
Click on the Process definition, return to the list of process definitions, click on the icon "online", online process definition.
Before setting workflow offline, the timed tasks in timed management should be offline, so that the definition of workflow can be set offline successfully.
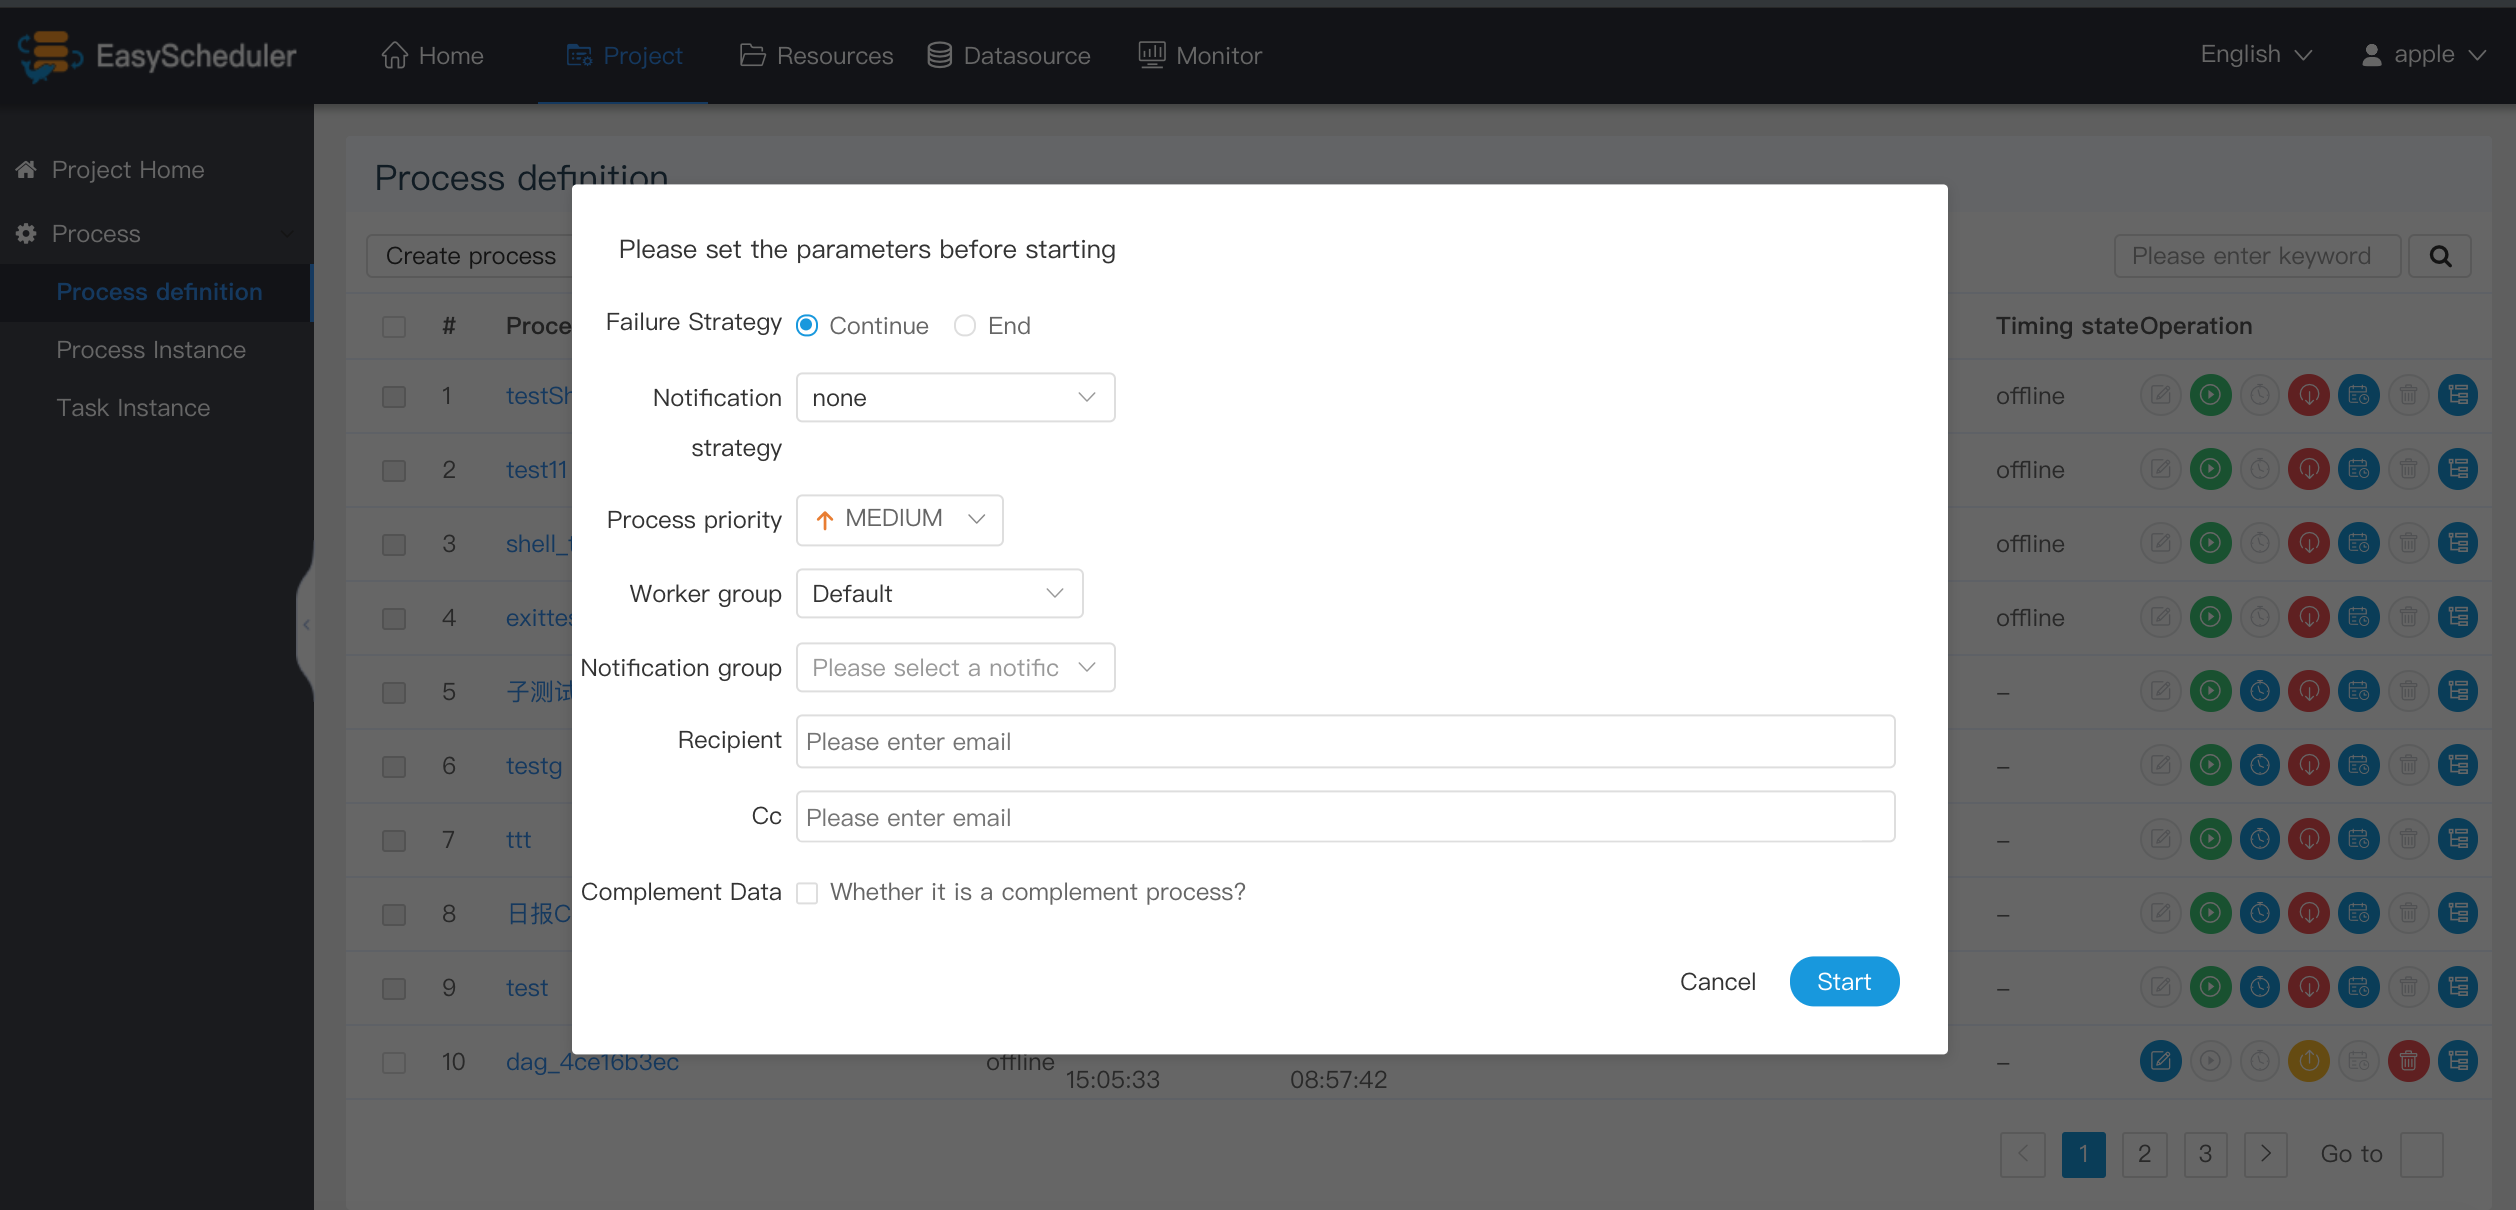
Click "Run" to execute the process. Description of operation parameters:
- Failure strategy:When a task node fails to execute, other parallel task nodes need to execute the strategy。”Continue "Representation: Other task nodes perform normally", "End" Representation: Terminate all ongoing tasks and terminate the entire process.
- Notification strategy:When the process is over, send process execution information notification mail according to the process status.
- Process priority: The priority of process running is divided into five levels:the highest, the high, the medium, the low, and the lowest . High-level processes are executed first in the execution queue, and processes with the same priority are executed first in first out order.
- Worker group: This process can only be executed in a specified machine group. Default, by default, can be executed on any worker.
- Notification group: When the process ends or fault tolerance occurs, process information is sent to all members of the notification group by mail.
- Recipient: Enter the mailbox and press Enter key to save. When the process ends and fault tolerance occurs, an alert message is sent to the recipient list.
- Cc: Enter the mailbox and press Enter key to save. When the process is over and fault-tolerant occurs, alarm messages are copied to the copier list.
- Complement: To implement the workflow definition of a specified date, you can select the time range of the complement (currently only support for continuous days), such as the data from May 1 to May 10, as shown in the figure:

Complement execution mode includes serial execution and parallel execution. In serial mode, the complement will be executed sequentially from May 1 to May 10. In parallel mode, the tasks from May 1 to May 10 will be executed simultaneously.
Timing Process Definition
- Create Timing: "Process Definition - > Timing"
- Choose start-stop time, in the start-stop time range, regular normal work, beyond the scope, will not continue to produce timed workflow instances.
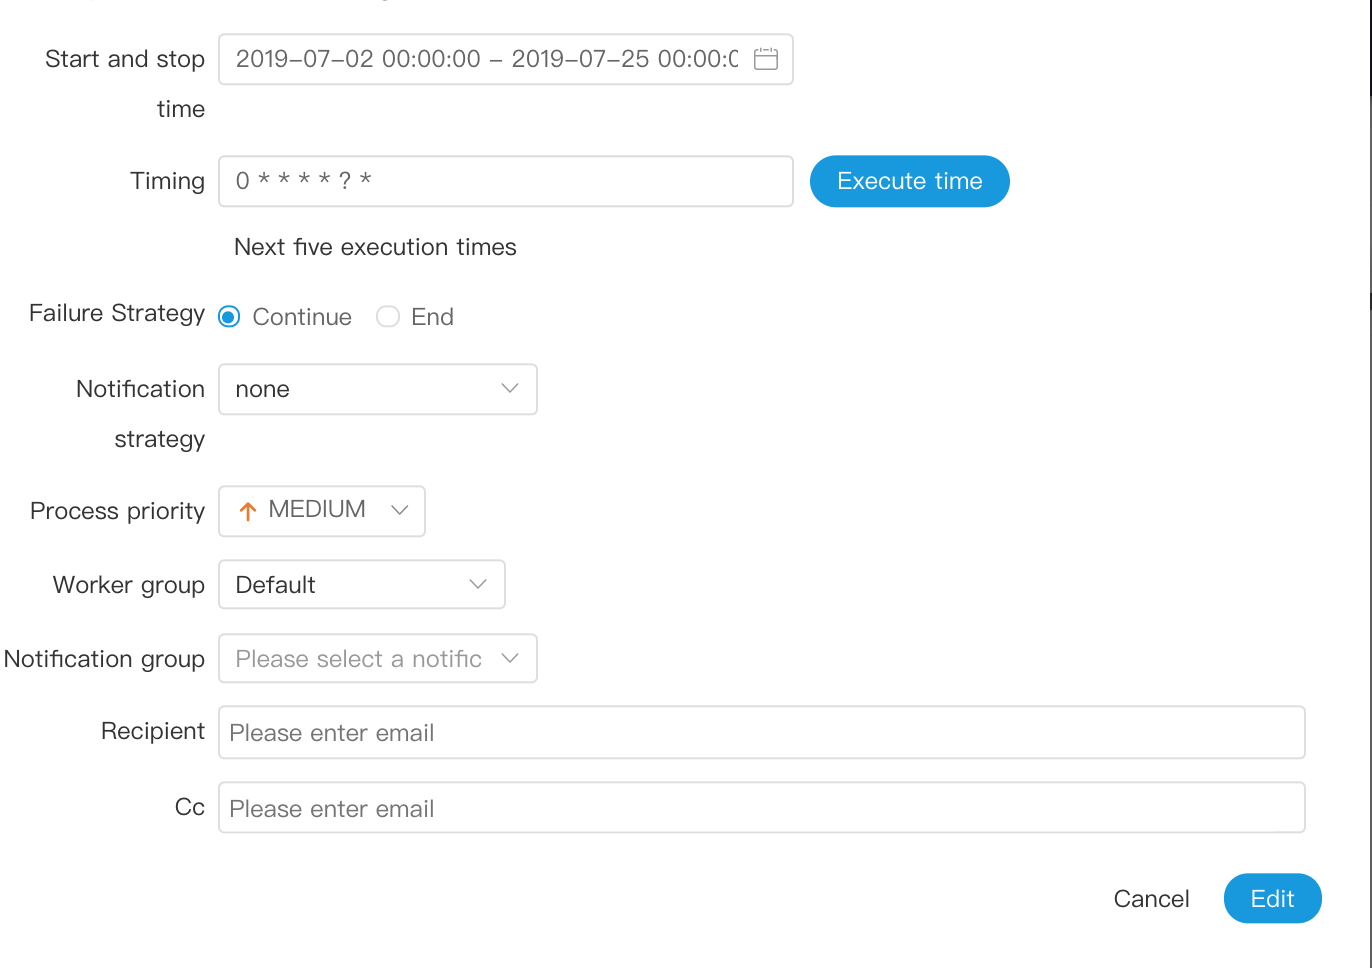
Add a timer to be executed once a day at 5:00 a.m. as shown below:

Timely online,the newly created timer is offline. You need to click "Timing Management - >online" to work properly.
View process instances
Click on "Process Instances" to view the list of process instances.
Click on the process name to see the status of task execution.

Click on the task node, click "View Log" to view the task execution log.

Click on the task instance node, click View History to view the list of task instances that the process instance runs.

Operations on workflow instances:

- Editor: You can edit the terminated process. When you save it after editing, you can choose whether to update the process definition or not.
- Rerun: A process that has been terminated can be re-executed.
- Recovery failure: For a failed process, a recovery failure operation can be performed, starting at the failed node.
- Stop: Stop the running process, the background will
killhe worker process first, thenkill -9operation. - Pause:The running process can be suspended, the system state becomes waiting to be executed, waiting for the end of the task being executed, and suspending the next task to be executed.
- Restore pause: The suspended process can be restored and run directly from the suspended node
- Delete: Delete process instances and task instances under process instances
- Gantt diagram: The vertical axis of Gantt diagram is the topological ordering of task instances under a process instance, and the horizontal axis is the running time of task instances, as shown in the figure:

View task instances
Click on "Task Instance" to enter the Task List page and query the performance of the task.

Click "View Log" in the action column to view the log of task execution.

Create data source
Data Source Center supports MySQL, POSTGRESQL, HIVE and Spark data sources.
Create and edit MySQL data source
- Click on "Datasource - > Create Datasources" to create different types of datasources according to requirements.
- Datasource: Select MYSQL
- Datasource Name: Name of Input Datasource
- Description: Description of input datasources
- IP: Enter the IP to connect to MySQL
- Port: Enter the port to connect MySQL
- User name: Set the username to connect to MySQL
- Password: Set the password to connect to MySQL
- Database name: Enter the name of the database connecting MySQL
- Jdbc connection parameters: parameter settings for MySQL connections, filled in as JSON

Click "Test Connect" to test whether the data source can be successfully connected.
Create and edit POSTGRESQL data source
- Datasource: Select POSTGRESQL
- Datasource Name: Name of Input Data Source
- Description: Description of input data sources
- IP: Enter IP to connect to POSTGRESQL
- Port: Input port to connect POSTGRESQL
- Username: Set the username to connect to POSTGRESQL
- Password: Set the password to connect to POSTGRESQL
- Database name: Enter the name of the database connecting to POSTGRESQL
- Jdbc connection parameters: parameter settings for POSTGRESQL connections, filled in as JSON

Create and edit HIVE data source
1.Connect with HiveServer 2

- Datasource: Select HIVE
- Datasource Name: Name of Input Datasource
- Description: Description of input datasources
- IP: Enter IP to connect to HIVE
- Port: Input port to connect to HIVE
- Username: Set the username to connect to HIVE
- Password: Set the password to connect to HIVE
- Database Name: Enter the name of the database connecting to HIVE
- Jdbc connection parameters: parameter settings for HIVE connections, filled in in as JSON
2.Connect using Hive Server 2 HA Zookeeper mode

Note: If kerberos is turned on, you need to fill in Principal

Create and Edit Datasource

- Datasource: Select Spark
- Datasource Name: Name of Input Datasource
- Description: Description of input datasources
- IP: Enter the IP to connect to Spark
- Port: Input port to connect Spark
- Username: Set the username to connect to Spark
- Password: Set the password to connect to Spark
- Database name: Enter the name of the database connecting to Spark
- Jdbc Connection Parameters: Parameter settings for Spark Connections, filled in as JSON
Note: If kerberos If Kerberos is turned on, you need to fill in Principal

Upload Resources
- Upload resource files and udf functions, all uploaded files and resources will be stored on hdfs, so the following configuration items are required:
conf/common/common.properties
    -- hdfs.startup.state=true
conf/common/hadoop.properties
    -- fs.defaultFS=hdfs://xxxx:8020
    -- yarn.resourcemanager.ha.rm.ids=192.168.xx.xx,192.168.xx.xx
    -- yarn.application.status.address=http://xxxx:8088/ws/v1/cluster/apps/%s
File Manage
It is the management of various resource files, including creating basic txt/log/sh/conf files, uploading jar packages and other types of files, editing, downloading, deleting and other operations.

- Create file
File formats support the following types:txt、log、sh、conf、cfg、py、java、sql、xml、hql

- Upload Files
Upload Files: Click the Upload button to upload, drag the file to the upload area, and the file name will automatically complete the uploaded file name.

- File View
For viewable file types, click on the file name to view file details

- Download files
You can download a file by clicking the download button in the top right corner of the file details, or by downloading the file under the download button after the file list.
- File rename

Delete
File List - > Click the Delete button to delete the specified file
Resource management
Resource management and file management functions are similar. The difference is that resource management is the UDF function of uploading, and file management uploads user programs, scripts and configuration files.
- Upload UDF resources
The same as uploading files.
Function management
- Create UDF Functions
Click "Create UDF Function", enter parameters of udf function, select UDF resources, and click "Submit" to create udf function.
Currently only temporary udf functions for HIVE are supported
- UDF function name: name when entering UDF Function
- Package Name: Full Path of Input UDF Function
- Parameter: Input parameters used to annotate functions
- Database Name: Reserved Field for Creating Permanent UDF Functions
- UDF Resources: Set up the resource files corresponding to the created UDF

Security
- The security has the functions of queue management, tenant management, user management, warning group management, worker group manager, token manage and other functions. It can also authorize resources, data sources, projects, etc.
- Administrator login, default username password: admin/escheduler 123
Create queues
- Queues are used to execute spark, mapreduce and other programs, which require the use of "queue" parameters.
- "Security" - > "Queue Manage" - > "Creat Queue"

- "Security" - > "Queue Manage" - > "Creat Queue"
Create Tenants
- The tenant corresponds to the account of Linux, which is used by the worker server to submit jobs. If Linux does not have this user, the worker would create the account when executing the task.
Tenant Code:the tenant code is the only account on Linux that can't be duplicated.

Create Ordinary Users
- User types are ordinary users and administrator users..
- Administrators have authorization and user management privileges, and no privileges to create project and process-defined operations.
- Ordinary users can create projects and create, edit, and execute process definitions.
- Note: If the user switches the tenant, all resources under the tenant will be copied to the switched new tenant.

Create alarm group
- The alarm group is a parameter set at start-up. After the process is finished, the status of the process and other information will be sent to the alarm group by mail.
- New and Editorial Warning Group

Create Worker Group
Worker group provides a mechanism for tasks to run on a specified worker. Administrators create worker groups, which can be specified in task nodes and operation parameters. If the specified grouping is deleted or no grouping is specified, the task will run on any worker.
- Multiple IP addresses within a worker group (aliases can not be written), separated by commas in English

Token manage
- Because the back-end interface has login check and token management, it provides a way to operate the system by calling the interface.
- Call examples:
    /**
     * test token
     */
    public  void doPOSTParam()throws Exception{
        // create HttpClient
        CloseableHttpClient httpclient = HttpClients.createDefault();

        // create http post request
        HttpPost httpPost = new HttpPost("http://127.0.0.1:12345/escheduler/projects/create");
        httpPost.setHeader("token", "123");
        // set parameters
        List<NameValuePair> parameters = new ArrayList<NameValuePair>();
        parameters.add(new BasicNameValuePair("projectName", "qzw"));
        parameters.add(new BasicNameValuePair("desc", "qzw"));
        UrlEncodedFormEntity formEntity = new UrlEncodedFormEntity(parameters);
        httpPost.setEntity(formEntity);
        CloseableHttpResponse response = null;
        try {
            // execute
            response = httpclient.execute(httpPost);
            // eponse status code 200
            if (response.getStatusLine().getStatusCode() == 200) {
                String content = EntityUtils.toString(response.getEntity(), "UTF-8");
                System.out.println(content);
            }
        } finally {
            if (response != null) {
                response.close();
            }
            httpclient.close();
        }
    }
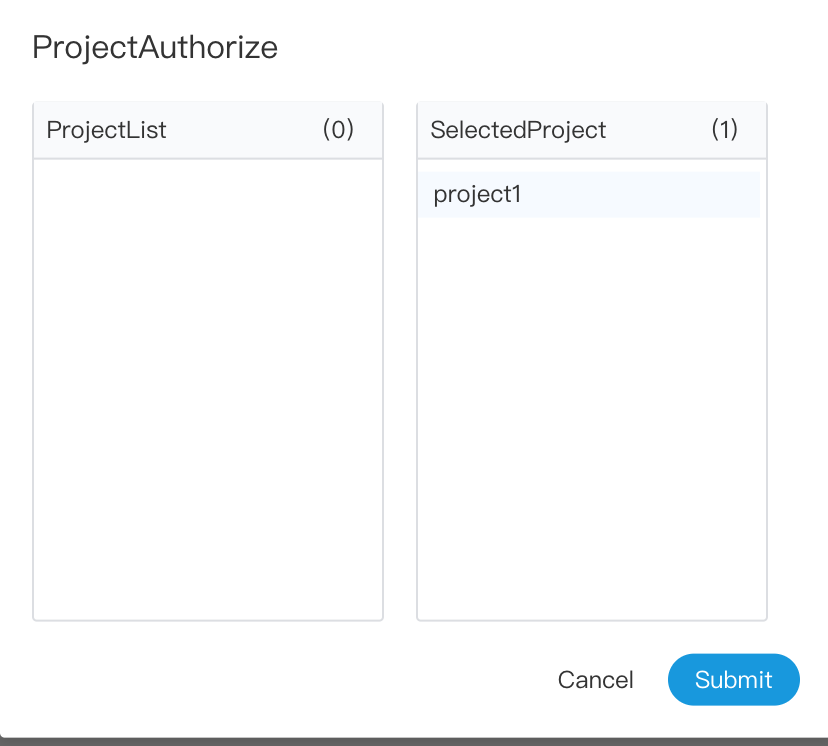
Grant authority
- Granting permissions includes project permissions, resource permissions, datasource permissions, UDF Function permissions.
Administrators can authorize projects, resources, data sources and UDF Functions that are not created by ordinary users. Because project, resource, data source and UDF Function are all authorized in the same way, the project authorization is introduced as an example.
Note:For projects created by the user himself, the user has all the permissions. The list of items and the list of selected items will not be reflected
- 1.Click on the authorization button of the designated person as follows:

- 2.Select the project button to authorize the project
Monitor center
- Service management is mainly to monitor and display the health status and basic information of each service in the system.
Master monitor
- Mainly related information about master.

Worker monitor
- Mainly related information of worker.

Zookeeper monitor
- Mainly the configuration information of each worker and master in zookpeeper.

Mysql monitor
- Mainly the health status of mysql

Task Node Type and Parameter Setting
Shell
- The shell node, when the worker executes, generates a temporary shell script, which is executed by a Linux user with the same name as the tenant.
Drag the
 task node in the toolbar onto the palette and double-click the task node as follows:


- Node name: The node name in a process definition is unique
- Run flag: Identify whether the node is scheduled properly
- Description: Describes the function of the node
- Sub-node: The process definition of the selected sub-process is selected, and the process definition of the selected sub-process can be jumped to by entering the sub-node in the upper right corner.
DEPENDENT
- Dependent nodes are dependent checking nodes. For example, process A depends on the successful execution of process B yesterday, and the dependent node checks whether process B has a successful execution instance yesterday.
Drag the
ask node in the toolbar onto the palette and double-click the task node as follows:

Dependent nodes provide logical judgment functions, such as checking whether yesterday's B process was successful or whether the C process was successfully executed.
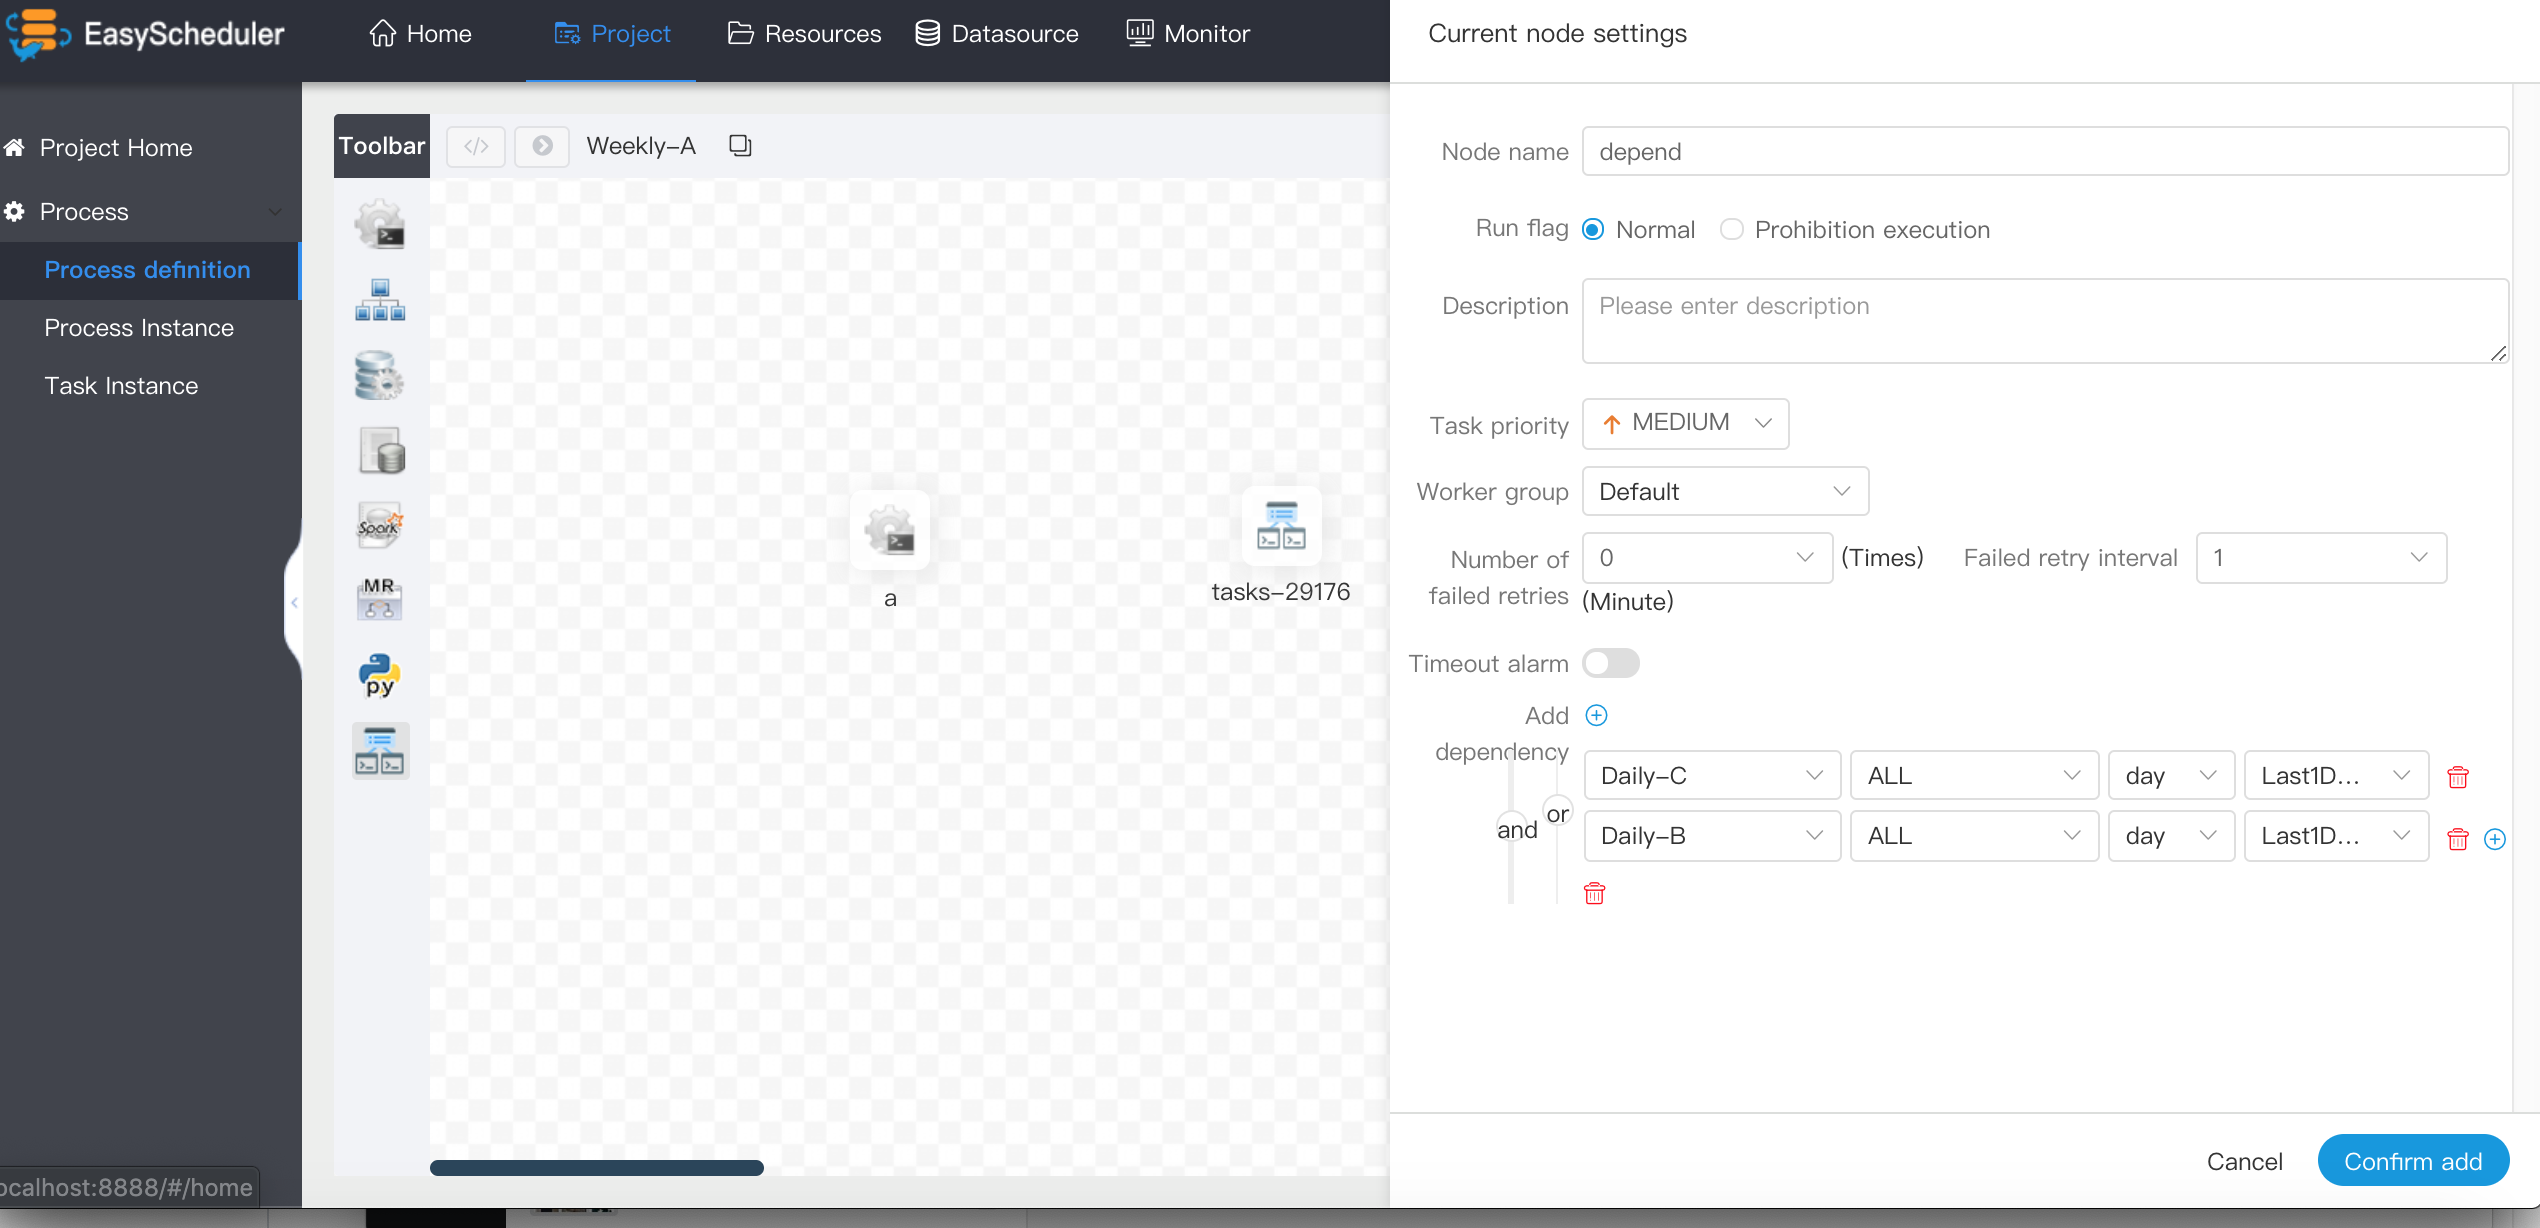
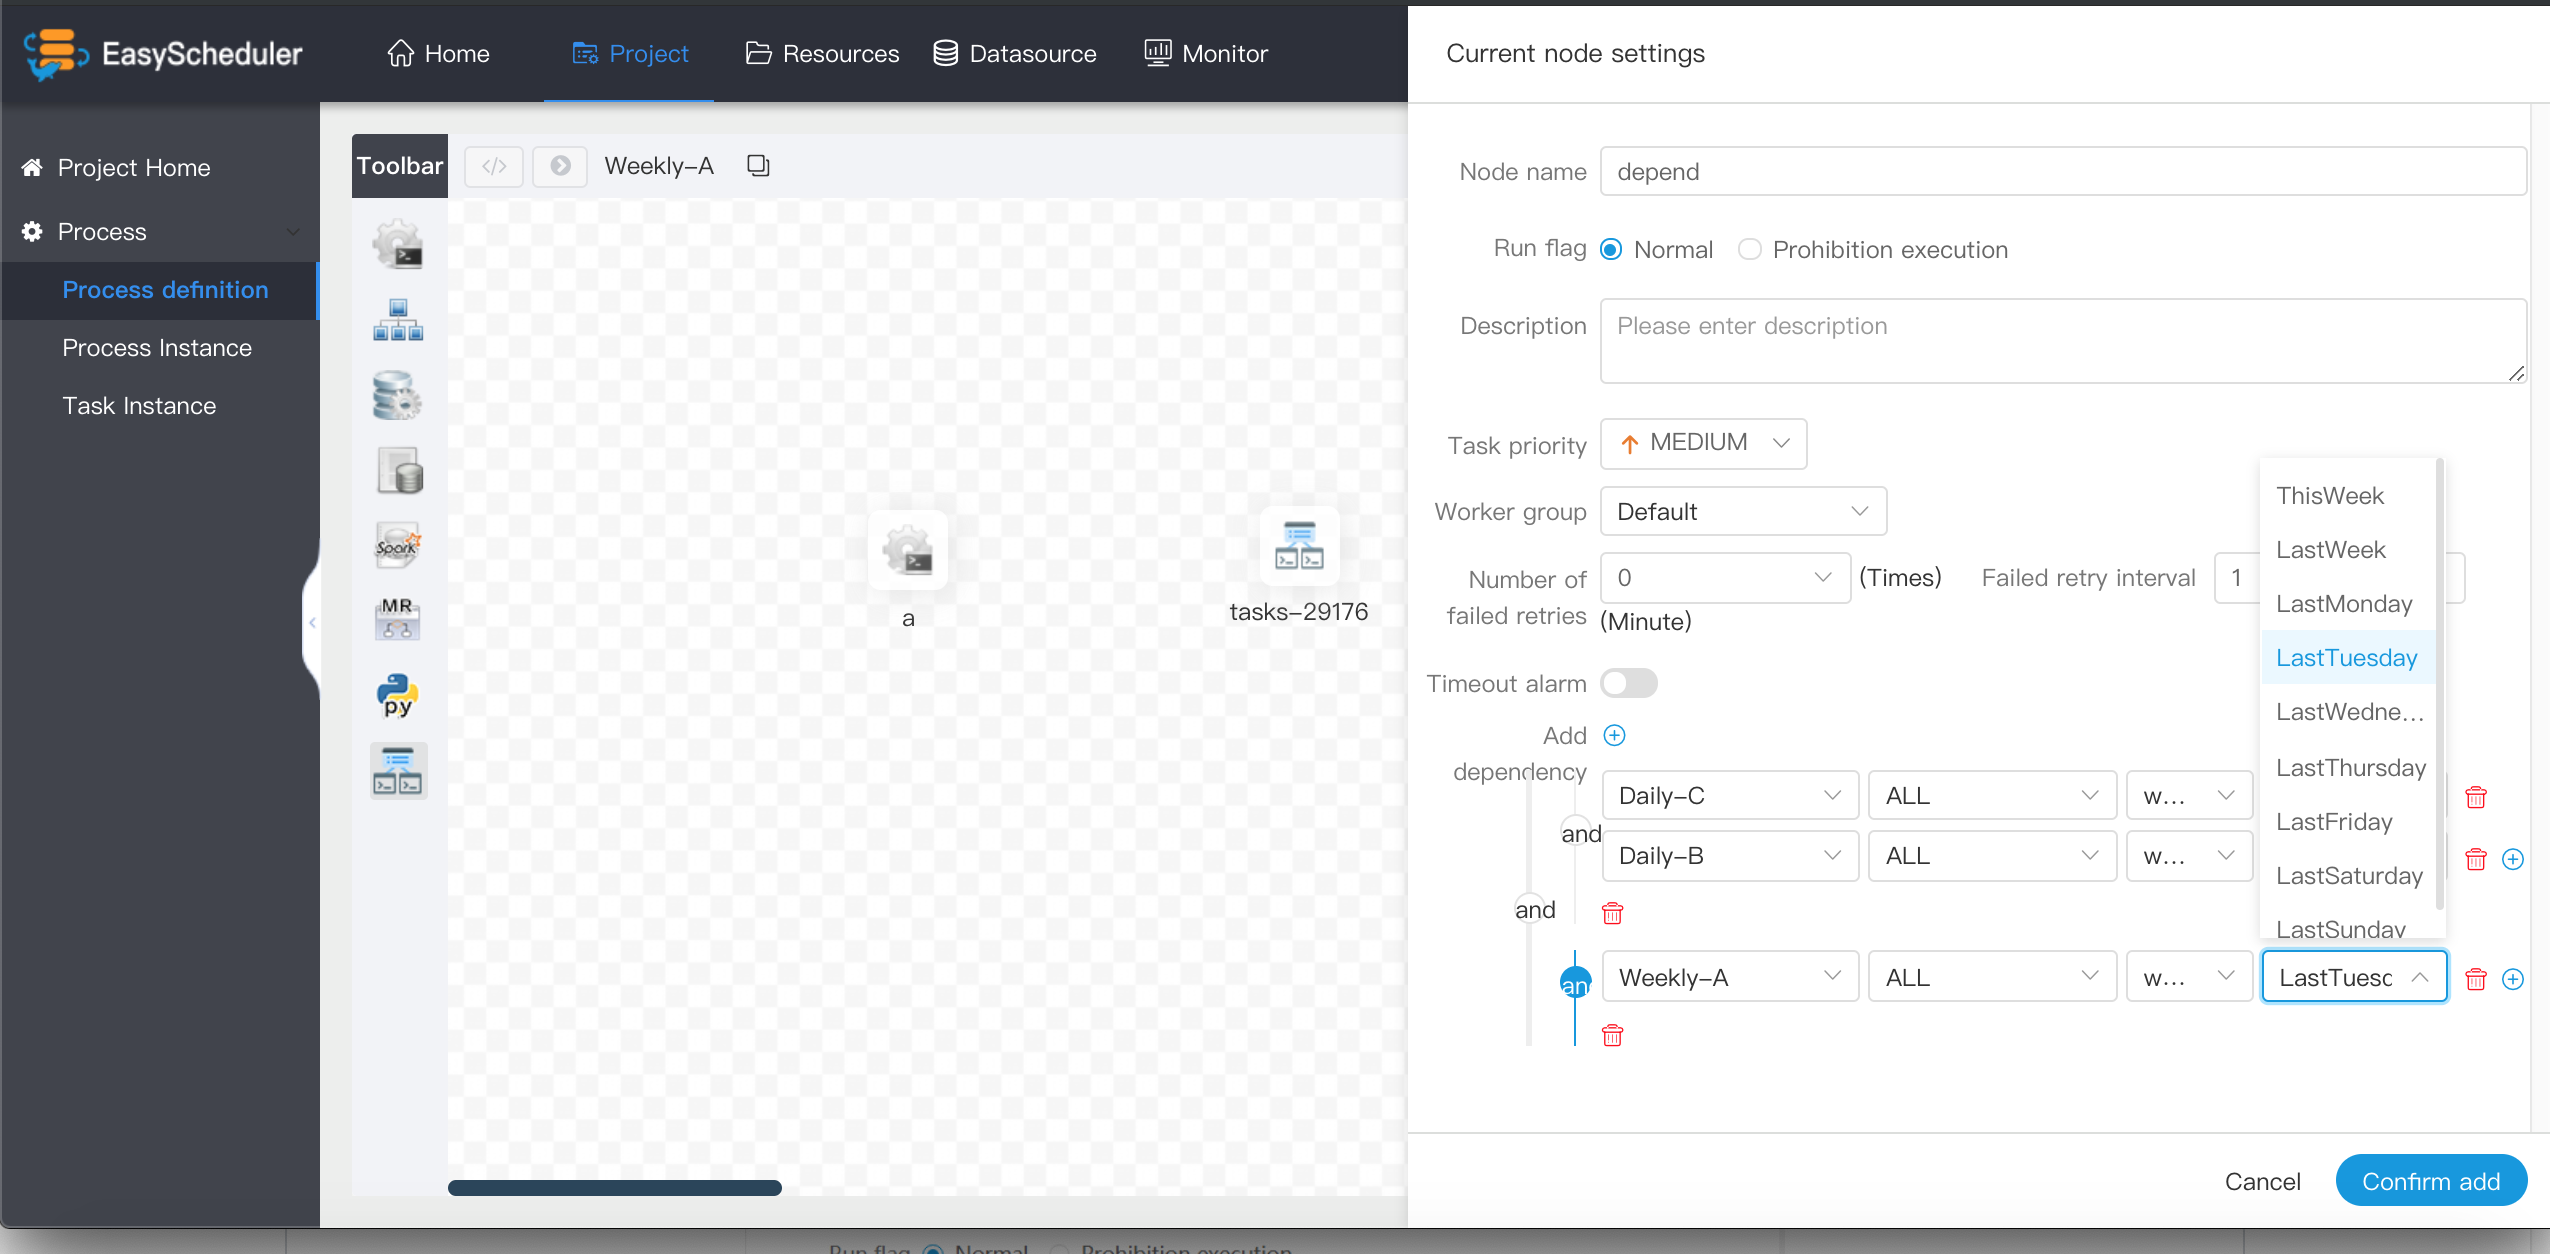
For example, process A is a weekly task and process B and C are daily tasks. Task A requires that task B and C be successfully executed every day of the last week, as shown in the figure:

If weekly A also needs to be implemented successfully on Tuesday:
PROCEDURE
- The procedure is executed according to the selected data source.
Drag the
 task node in the toolbar onto the palette and double-click the task node as follows:

- Datasource: The data source type of stored procedure supports MySQL and POSTGRRESQL, and chooses the corresponding data source.
- Method: The method name of the stored procedure
- Custom parameters: Custom parameter types of stored procedures support IN and OUT, and data types support nine data types: VARCHAR, INTEGER, LONG, FLOAT, DOUBLE, DATE, TIME, TIMESTAMP and BOOLEAN.
SQL
Execute non-query SQL functionality

Executing the query SQL function, you can choose to send mail in the form of tables and attachments to the designated recipients.
Drag the
 task node in the toolbar onto the palette and double-click the task node as follows:

- Datasource: Select the corresponding datasource
- sql type: support query and non-query, query is select type query, there is a result set returned, you can specify mail notification as table, attachment or table attachment three templates. Non-query is not returned by result set, and is for update, delete, insert three types of operations
- sql parameter: input parameter format is key1 = value1; key2 = value2...
- sql statement: SQL statement
- UDF function: For HIVE type data sources, you can refer to UDF functions created in the resource center, other types of data sources do not support UDF functions for the time being.
- Custom parameters: SQL task type, and stored procedure is to customize the order of parameters to set values for methods. Custom parameter type and data type are the same as stored procedure task type. The difference is that the custom parameter of the SQL task type replaces the ${variable} in the SQL statement.
SPARK
- Through SPARK node, SPARK program can be directly executed. For spark node, worker will use
spark-submitmode to submit tasks.
Drag the
task node in the toolbar onto the palette and double-click the task node as follows:

- Program Type: Support JAVA, Scala and Python
- Class of the main function: The full path of Main Class, the entry to the Spark program
- Master jar package: It's Spark's jar package
- Deployment: support three modes: yarn-cluster, yarn-client, and local
- Driver Kernel Number: Driver Kernel Number and Memory Number can be set
- Executor Number: Executor Number, Executor Memory Number and Executor Kernel Number can be set
- Command Line Parameters: Setting the input parameters of Spark program to support the replacement of custom parameter variables.
- Other parameters: support - jars, - files, - archives, - conf format
- Resource: If a resource file is referenced in other parameters, you need to select the specified resource.
- Custom parameters: User-defined parameters in MR locality that replace the contents in scripts with ${variables}
Note: JAVA and Scala are just used for identification, no difference. If it's a Spark developed by Python, there's no class of the main function, and everything else is the same.
MapReduce(MR)
- Using MR nodes, MR programs can be executed directly. For Mr nodes, worker submits tasks using
hadoop jar
Drag the
task node in the toolbar onto the palette and double-click the task node as follows:
JAVA program

- Class of the main function: The full path of the MR program's entry Main Class
- Program Type: Select JAVA Language
- Master jar package: MR jar package
- Command Line Parameters: Setting the input parameters of MR program to support the replacement of custom parameter variables
- Other parameters: support - D, - files, - libjars, - archives format
- Resource: If a resource file is referenced in other parameters, you need to select the specified resource.
Custom parameters: User-defined parameters in MR locality that replace the contents in scripts with ${variables}
Python program

- Program Type: Select Python Language
- Main jar package: Python jar package running MR
- Other parameters: support - D, - mapper, - reducer, - input - output format, where user-defined parameters can be set, such as:
- mapper "mapper.py 1" - file mapper.py-reducer reducer.py-file reducer.py-input/journey/words.txt-output/journey/out/mr/${current TimeMillis}
- Among them, mapper. py 1 after - mapper is two parameters, the first parameter is mapper. py, and the second parameter is 1.
- Resource: If a resource file is referenced in other parameters, you need to select the specified resource.
- Custom parameters: User-defined parameters in MR locality that replace the contents in scripts with ${variables}
Python
- With Python nodes, Python scripts can be executed directly. For Python nodes, worker will use
python **to submit tasks.
Drag the
task node in the toolbar onto the palette and double-click the task node as follows:

- Script: User-developed Python program
- Resource: A list of resource files that need to be invoked in a script
- Custom parameters: User-defined parameters that are part of Python that replace the contents in the script with ${variables}
System parameter
| variable | meaning |
|---|---|
| ${system.biz.date} | The timing time of routine dispatching instance is one day before, in yyyyyMMdd format. When data is supplemented, the date + 1 |
| ${system.biz.curdate} | Daily scheduling example timing time, format is yyyyyMMdd, when supplementing data, the date + 1 |
| ${system.datetime} | Daily scheduling example timing time, format is yyyyyMMddHmmss, when supplementing data, the date + 1 |
Time Customization Parameters
Support code to customize the variable name, declaration: ${variable name}. It can refer to "system parameters" or specify "constants".
When we define this benchmark variable as $[...], [yyyyMMddHHmmss] can be decomposed and combined arbitrarily, such as:$[yyyyMMdd], $[HHmmss], $[yyyy-MM-dd] ,etc.
Can also do this:
- Later N years: $[add_months (yyyyyyMMdd, 12*N)]
- The previous N years: $[add_months (yyyyyyMMdd, -12*N)]
- Later N months: $[add_months (yyyyyMMdd, N)]
- The first N months: $[add_months (yyyyyyMMdd, -N)]
- Later N weeks: $[yyyyyyMMdd + 7*N]
- The first N weeks: $[yyyyyMMdd-7*N]
- The day after that: $[yyyyyyMMdd + N]
- The day before yesterday: $[yyyyyMMdd-N]
- Later N hours: $[HHmmss + N/24]
- First N hours: $[HHmmss-N/24]
- After N minutes: $[HHmmss + N/24/60]
- First N minutes: $[HHmmss-N/24/60]
User-defined parameters
User-defined parameters are divided into global parameters and local parameters. Global parameters are the global parameters passed when the process definition and process instance are saved. Global parameters can be referenced by local parameters of any task node in the whole process.
For example:
global_bizdate is a global parameter, referring to system parameters.

In tasks, local_param_bizdate refers to global parameters by ${global_bizdate} for scripts, the value of variable local_param_bizdate can be referenced by${local_param_bizdate}, or the value of local_param_bizdate can be set directly by JDBC.